
Preparation:
- Gather your supplies:
- Paint sprayer (suitable for stain, like Wagner Fence & Decking Sprayer)
- Stain (ensure it’s compatible with your sprayer)
- Stain mixing bucket with stir stick
- Drop cloths or plastic sheeting to protect surrounding areas
- Painter’s tape (optional, for extra protection)
- Safety gear: goggles, respirator, gloves
- Stiff-bristled brush (for back-brushing)
- Garden hose with nozzle (for rinsing)
- Rags
- Prep the fence:
- Remove any plants, furniture, or decorations near the fence.
- Cleaning: Wash the fence thoroughly with a hose and a mild detergent solution. Let it dry completely (ideally for 24 hours).
- Repairs: Address any loose boards, splinters, or nail pops. Sand smooth any rough spots.
- Protect surrounding areas:
- Lay down drop cloths or plastic sheeting to catch overspray.
- You can use painter’s tape to further protect areas like sidewalks, patios, or house siding (optional).
Applying Stain:
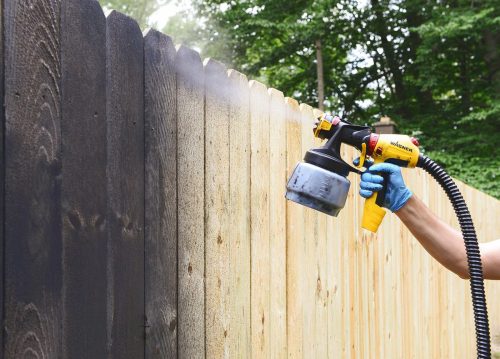
- Set up your sprayer:
- Consult the sprayer’s manual for specific instructions on setting it up and adjusting settings.
- Thin the stain according to the manufacturer’s recommendations (if necessary).
- Wear proper safety gear (goggles, respirator, gloves) throughout the staining process.
- Test spray:
- Practice on a scrap piece of wood or cardboard to get comfortable with the sprayer and adjust the settings for proper spray pattern and flow rate.
- Apply the stain:
- Work in sections, spraying with the grain of the wood (usually vertically for pickets).
- Start spraying slightly off the fence, then move the sprayer across the board, and finally stop spraying slightly off the other end. This helps avoid heavy stain concentration at the beginning and end of each stroke.
- Apply a light, even coat. Avoid drenching the wood, as this can lead to drips and uneven coverage.
- Overlap each pass slightly to ensure complete coverage.
- Back-brushing (optional but highly recommended):
- Immediately after spraying a section, use a stiff-bristled brush to “back-brush” the stain. This helps even out the stain, push it into the wood grain, and remove any air bubbles or streaks.
- Continue section by section:
- Repeat steps 3 and 4 until the entire fence is stained.
- Clean up:
- While the stain is still wet, use a damp rag to wipe away any splatters or drips from surrounding areas.
- Follow the sprayer’s cleaning instructions, which typically involve flushing the system with clean water.
Additional Tips:
- Work on a calm, windless day to minimize overspray.
- Apply stain in the shade, as direct sunlight can cause the stain to dry too quickly and become uneven.
- For a more thorough job, consider applying a second coat of stain after the first coat has dried completely (usually 4-8 hours, depending on the stain).
- Dispose of leftover stain and rags according to local regulations.
By following these steps and using a paint sprayer suitable for stain, you can achieve a smooth, even finish on your wooden fence in a fraction of the time it would take with a brush or roller.
Discover more from CheaperFence
Subscribe to get the latest posts sent to your email.

