
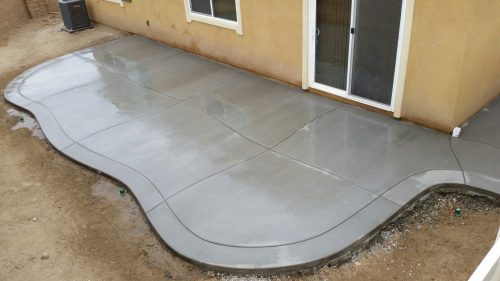
Whether you’re building a foundation for a fence, a patio, or a simple walkway, pouring a concrete slab is a manageable and cost-effective DIY project. In this guide, we’ll walk you through the steps to create a solid, durable slab without breaking the bank. You’ll also find some helpful tips to save money and time along the way.
Step 1: Plan Your Slab
1.1. Figure Out the Size
- First, determine the dimensions of your slab. For a fence foundation, walkways, or light structures, a thickness of 4 inches is typical, but it could vary based on the weight it will bear.
1.2. Calculate Concrete Needs
- Use an online concrete calculator to figure out how much concrete you need. This will help you avoid over-ordering and wasting money.
1.3. Check the Site
- Ensure the site is flat and free of large debris. If the ground is uneven, you’ll want to level it out before you get started.
Step 2: Prep the Site for Pouring
2.1. Clear the Area
- Remove grass, rocks, and any obstacles. You can do this with a shovel or even a small rake.
2.2. Dig the Slab Area
- Excavate the area where the slab will go. A depth of 4-6 inches is typical, but adjust based on your slab’s purpose. If you need a stronger base, add a gravel layer underneath (around 3-4 inches) for extra drainage.
2.3. Level the Ground
- Use a level or a string line to ensure the ground is flat before you move on. The smoother the surface, the easier it will be to pour your concrete evenly.
Step 3: Build the Forms

3.1. Set Up the Form
- You’ll need wooden planks or cheap plastic forms to outline your slab. These should sit slightly above the ground level to accommodate for settling.
3.2. Ensure Square and Level
- Use a carpenter’s square to check the corners of your form are at 90 degrees. It’s crucial for a proper fit, especially if you’re planning to attach a fence to the slab!
3.3. Secure the Forms
- Stake the forms down with metal or wooden stakes, making sure they’re solid and won’t shift when you pour the concrete.
Step 4: Reinforce the Slab
4.1. Use Rebar or Wire Mesh
- For a strong, durable slab, lay reinforcement like rebar (steel rods) or wire mesh. This keeps your concrete from cracking over time, especially for fence foundations or heavier use areas.
4.2. Raise the Reinforcement
- Use small blocks or rebar chairs to keep your reinforcement off the ground and in the middle of the slab. This helps distribute the weight more evenly.
Step 5: Mixing the Concrete
5.1. Choose Your Mix
- For most DIY concrete slabs, a ready-mix concrete will do the job. But if you’re mixing it yourself, you’ll need a mix of cement, sand, and gravel in the right ratio (usually 1:2:3). Adding water slowly will help achieve the right consistency.
5.2. Mix Properly
- Mix the concrete thoroughly in a wheelbarrow or concrete mixer until it reaches a thick but workable consistency. Avoid making it too runny—this can weaken the slab.
Step 6: Pour the Concrete
6.1. Pour in Layers
- Begin pouring the concrete into the form, starting at one corner and spreading it evenly across the slab. Make sure to work in small sections to avoid the mix setting before you’ve had a chance to smooth it out.
6.2. Spread and Level
- Use a shovel, rake, or hoe to distribute the concrete evenly. Level the top with a screed board (a long, straight board) to remove excess concrete.
Step 7: Finish the Surface
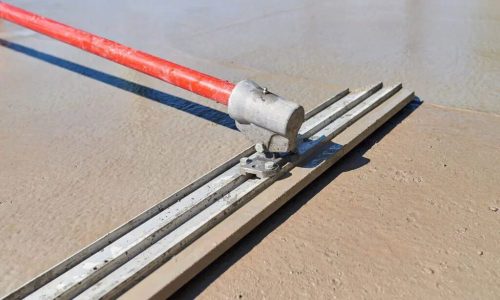
7.1. Smooth It Out
- Once the slab is filled and level, smooth the surface with a hand trowel or a power trowel if you’re working on a larger project. For a simple finish, you can go for a flat surface.
7.2. Texturing (Optional)
- If you want a non-slip surface (like for a patio or walkway), use a broom to add texture by sweeping it across the surface before it sets.
Step 8: Curing the Concrete
8.1. Keep It Moist
- Concrete needs to cure slowly to reach full strength. Cover your slab with a plastic sheet or curing blankets to keep moisture in. Keep the surface moist for at least 7 days to prevent cracking.
8.2. Wait for Full Curing
- Although the concrete might set in 24-48 hours, wait at least a week before using it for heavy loads. Full curing takes up to 28 days, but the slab will be strong enough for light uses before then.
Step 9: Removing the Forms
9.1. Wait for the Slab to Set
- Allow the concrete to firm up, then carefully remove the forms. Tap them gently with a hammer to loosen them.
9.2. Clean Up
- Once the forms are removed, clean up any leftover concrete and tidy up your work area. If you’re adding a fence to your slab, this is the time to install your posts.
Step 10: Final Touches and Maintenance
10.1. Continue Curing
- Keep curing your slab as needed for maximum strength. A little extra patience will make the difference between a sturdy slab and one that cracks early on.
10.2. Check for Cracks
- After curing, check the slab for cracks. Small cracks are common, but larger ones should be addressed with patching compounds.
Tips for Saving Money and Time:
- Rent a Mixer: If you have a lot of concrete to mix, renting a concrete mixer might be cheaper than buying bags of pre-mixed concrete.
- Shop Around for Materials: Look for deals on concrete, gravel, and forms at local home improvement stores. You can often find discount sections or use coupons.
- DIY vs. Professional: If your slab is for something heavy-duty, like a foundation for a large fence or structure, consider hiring a pro to reinforce it properly.
Conclusion: Building a concrete slab is a straightforward and budget-friendly DIY project, whether you’re working on a fence foundation, patio, or walkway. By following these steps, you’ll have a solid and reliable slab ready for whatever you need! Make sure to plan carefully, stay patient during the curing process, and you’ll be rewarded with a slab that will last for years.
Happy building from all of us at CheaperFence.com!
You must be logged in to post a comment.